Read & Write data on Avail DA
BEFORE YOU BEGIN
We recommend you go through these two pages in our docs before proceeding:
Get Testnet Tokens: To help you get set with someAVAILtokens on the Turing testnet.Create an AppID: The guide below focusses on reading & submitting data on a particular AppID. It will help to be familiar with the concept.
Setting up the dev environment
In this guide we will use some dedicated libraries to interact with Avail DA.
To set up a dev environment for avail-js, please follow the steps outlined here.
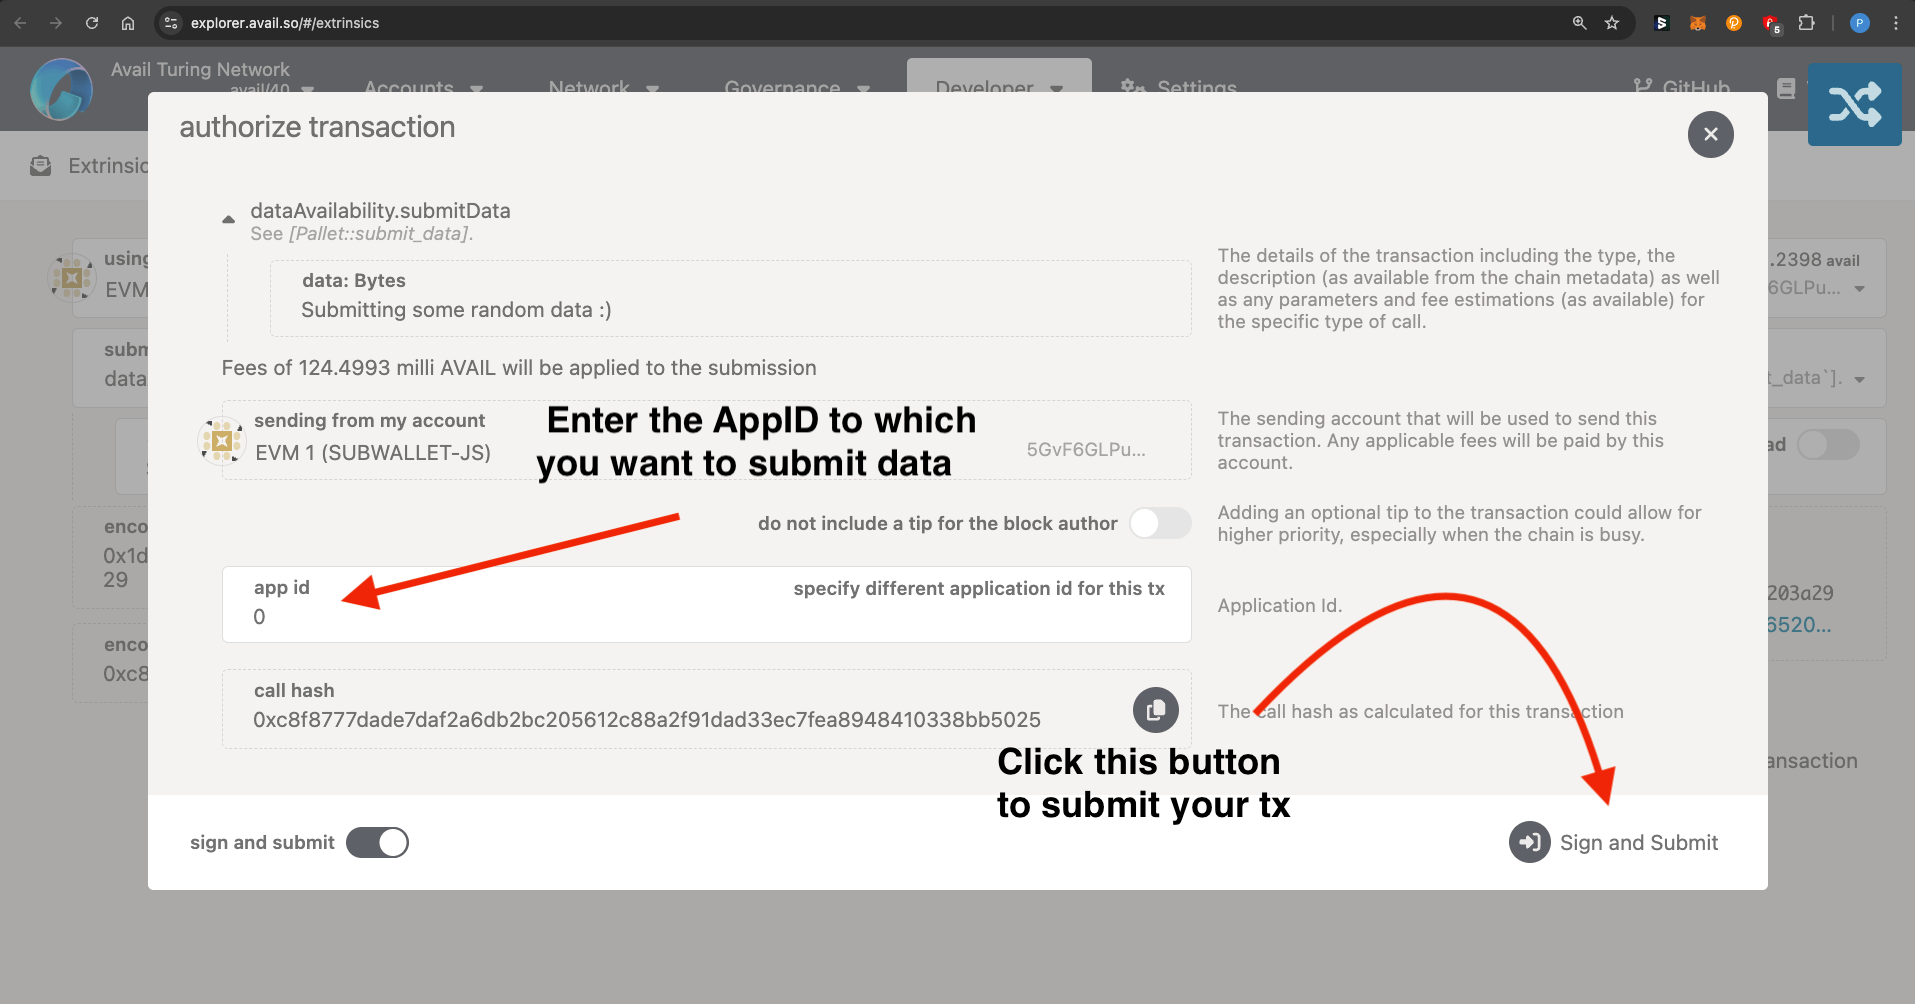
Submitting data to Avail DA
avail-js
-
Create a file named
your-file-name.ts -
Paste the following code into the file:
This pice of code submits:
- A string named
datato Avail DA - to the
appIDof 89 - We expect devs to submit data to their own specific
appIDs.
import * as dotenv from 'dotenv';
import { Account, SDK, Pallets } from 'avail-js-sdk';

dotenv.config();

export async function submitData() {

    // Initialize the SDK with a public Turing testnet endpoint
    // You can always switch it out with your own endpoint
    const sdk = await SDK.New('wss://turing-rpc.avail.so/ws');

    // Loading seed phrase and creating an account derived from the seed
    const seed = process.env.SEED;
    if (!seed) {
      throw new Error("SEED environment variable is not set");
    }

    // Create account from seed
    const account = Account.new(seed);
    console.log("Account Address: ", account.address);

    // Replace with your own AppID
    const appId = 89;
    console.log(`Submitting data to App Id: ${appId}`);

     // Create data submission transaction
    const data = "My Data Submission";
    const tx = sdk.tx.dataAvailability.submitData(data);
    console.log("Submitting transaction with data...");

    // Execute and wait for inclusion with app_id
    const res = await tx.executeWaitForInclusion(account, { app_id: appId });

    // Check if transaction was successful
    const isOk = res.isSuccessful();
    if (isOk === undefined) {
      throw new Error("Cannot check if transaction was successful");
    }
    else if (!isOk) {
        throw new Error("Transaction failed");
    }

    // Extract event data
    if (res.events === undefined) throw new Error("No events found");

    // Transaction Details
    console.log(
      `Block Hash: ${res.blockHash}, Block Number: ${res.blockNumber}, Tx Hash: ${res.txHash}, Tx Index: ${res.txIndex}`
    );

    // Find DataSubmitted event
    const event = res.events.findFirst(Pallets.DataAvailabilityEvents.DataSubmitted);
    if (event === undefined) throw new Error("DataSubmitted event not found");

    console.log(`Data submitted successfully:`);
    console.log(`Who: ${event.who}`);
    console.log(`DataHash: ${event.dataHash}`);

    console.log("Data submission completed successfully");
    process.exit(0);

}
submitData()- Run the script using the following command:
ts-node your-file-name.ts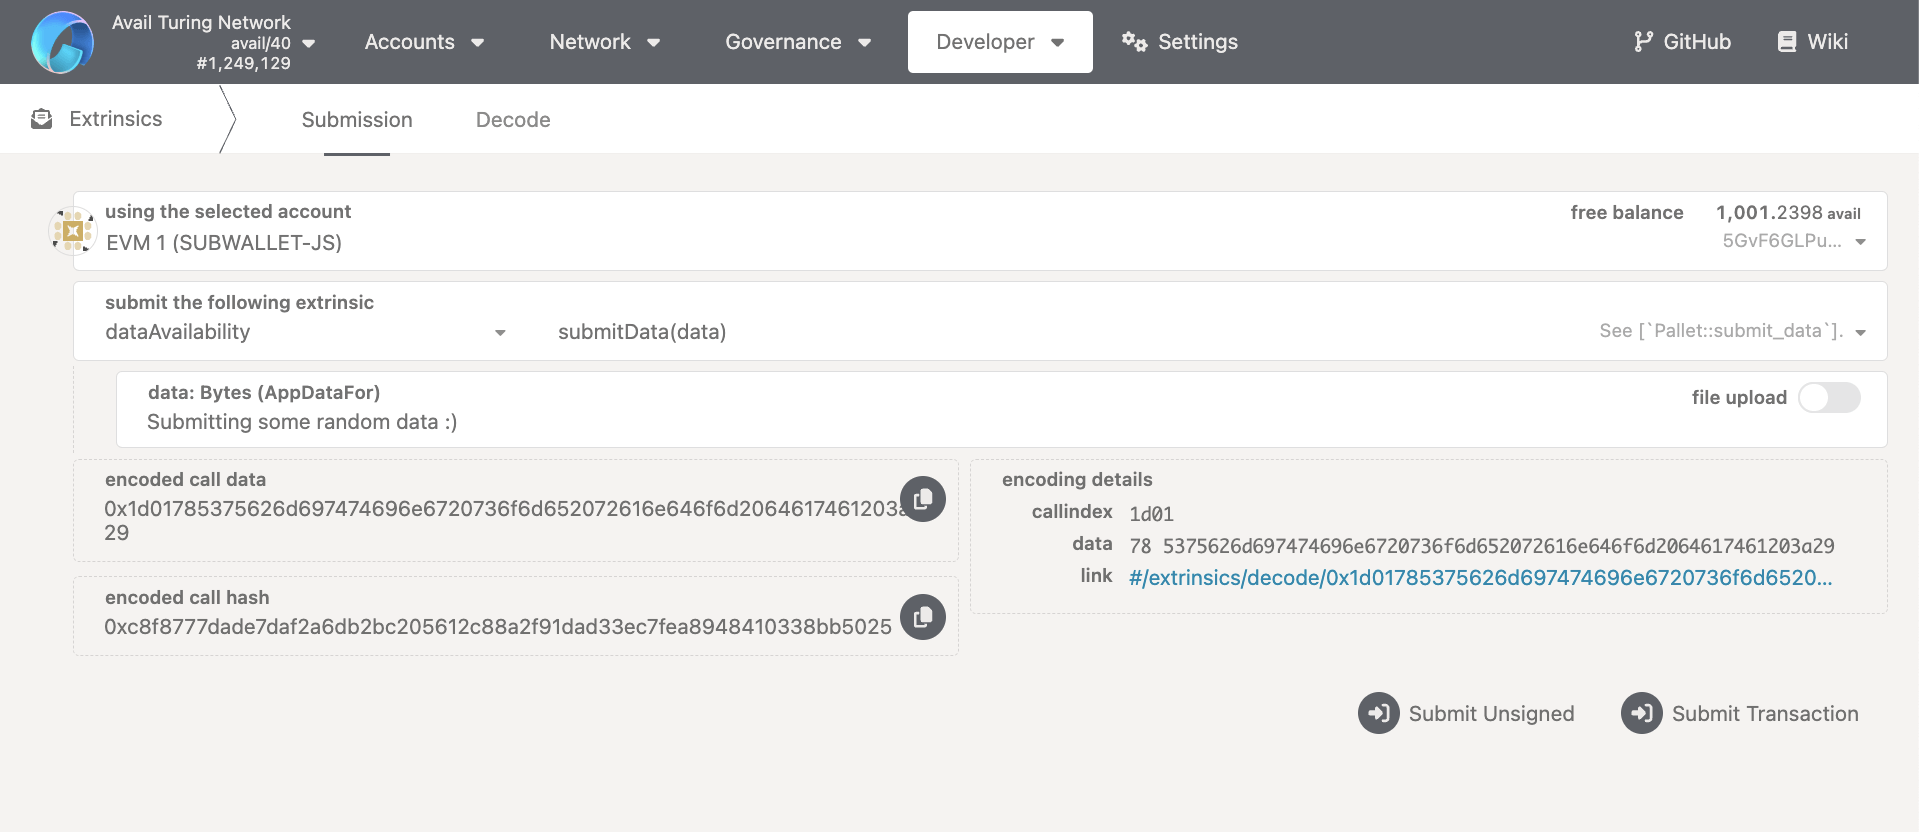
Fetch data submission transactions from Avail DA
Fetch data submissions using transaction hash and block hash
You can read back your submitted data from Avail DA using the
blockHashandtxHashof the transaction.
avail-js
-
Create a file named
your-file-name.ts -
Paste the following code into the file:
import { SDK, Block } from 'avail-js-sdk';

export async function readDataByHash() {

    // Initialize SDK with Turing endpoint
    const sdk = await SDK.New('wss://turing-rpc.avail.so/ws');

    // Transaction hash and block hash to look up
    const txHash = "0x70d8cc521c341d717f5b11d1898fc7a21f9d894c3617929aaabaea71c4814911";
    const blockHash = "0xd5f95593d91a581d7ce7b8717789298345be4be47e75ba93e7159cfe23083a7b";

    console.log(`Looking up transaction: ${txHash}`);
    console.log(`In block: ${blockHash}`);

    // Create a Block object for the specified block hash
    const block = await Block.New(sdk.client, blockHash);

    // Get data submissions for the specified transaction hash
    const blobs = block.dataSubmissions({ txHash: txHash });

    console.log(`Found ${blobs.length} data submission(s)`);

    // Display information for each data blob
    if (blobs.length === 0) {
        console.log("No data submissions found for this transaction");
    } else {
        console.log("\nData Submission Details:");
        for (const blob of blobs) {
            console.log(`Tx Hash: ${blob.txHash}`);
            console.log(`Tx Index: ${blob.txIndex}`);
            console.log(`Data (ASCII): ${blob.toAscii()}`);
            console.log(`App Id: ${blob.appId}`);
            console.log(`Signer: ${blob.txSigner}`);
            console.log("---");
        }
    }

    console.log("Data retrieval completed successfully");
    process.exit(0);

}
readDataByHash()- Run the script using the following command:
ts-node your-file-name.tsFetch data submissions using AppID
You can read back your submitted data from Avail DA using the
AppID.
avail-js
-
Create a file named
your-file-name.ts -
Paste the following code into the file:
import * as dotenv from 'dotenv';
import { SDK, Block } from 'avail-js-sdk';

dotenv.config();

export async function readDataByAppId() {

    // Initialize SDK with Turing endpoint
    const sdk = await SDK.New('wss://turing-rpc.avail.so/ws');

    // App ID and block hash to look up
    const appId = 89;
    const blockHash = "0xd5f95593d91a581d7ce7b8717789298345be4be47e75ba93e7159cfe23083a7b";

    console.log(`Looking up data for App ID: ${appId}`);
    console.log(`In block: ${blockHash}`);

    // Create a Block object for the specified block hash
    const block = await Block.New(sdk.client, blockHash);

    // Get data submissions for the specified app ID
    const blobs = block.dataSubmissions({ appId: appId });

    console.log(`Found ${blobs.length} data submission(s)`);

    // Display information for each data blob
    if (blobs.length === 0) {
        console.log("No data submissions found for this app ID");
    } else {
        console.log("\nData Submission Details:");
        for (const blob of blobs) {
            console.log(`Tx Hash: ${blob.txHash}`);
            console.log(`Tx Index: ${blob.txIndex}`);
            console.log(`Data (ASCII): ${blob.toAscii()}`);
            console.log(`App Id: ${blob.appId}`);
            console.log(`Signer: ${blob.txSigner}`);
            console.log("---");
        }
    }

    console.log("Data retrieval completed successfully");
    process.exit(0);


}
readDataByAppId()- Run the script using the following command:
ts-node your-file-name.tsFetch all data submissions for a given block
Here is a complete example of how to fetch all the data submissions for a given block:
avail-js
import * as dotenv from 'dotenv';
import { SDK, Block } from 'avail-js-sdk';

dotenv.config();

export async function readDataByBlock() {
    // Initialize SDK with Turing endpoint
    const sdk = await SDK.New('wss://turing-rpc.avail.so/ws');

    // Block hash to look up
    const blockHash = "0x94746ba186876d7407ee618d10cb6619befc59eeb173cacb00c14d1ff492fc58";

    console.log(`Looking up all data submissions in block: ${blockHash}`);

    // Create a Block object for the specified block hash
    const block = await Block.New(sdk.client, blockHash);

    // Get all data submissions in the block
    const blobs = block.dataSubmissions();

    console.log(`Found ${blobs.length} data submission(s)`);

    // Display information for each data blob
    if (blobs.length === 0) {
        console.log("No data submissions found in this block");
    } else {
        console.log("\nData Submission Details:");
        for (const blob of blobs) {
            console.log(`Tx Hash: ${blob.txHash}`);
            console.log(`Tx Index: ${blob.txIndex}`);
            console.log(`Data (ASCII): ${blob.toAscii()}`);
            console.log(`App Id: ${blob.appId}`);
            console.log(`Signer: ${blob.txSigner}`);
            console.log("---");
        }
    }

    console.log("Data retrieval completed successfully");
    process.exit(0);
}

// Execute the function
readDataByBlock();- Run the script using the following command:
ts-node your-file-name.tsFetch all types of transactions on Avail DA
Fetch all transactions by a particular signer in a block
Here is a complete example of how to fetch all the transactions by a particular signer in a particular block:
avail-js
-
Create a file named
your-file-name.ts -
Paste the following code into your file:
import { SDK, Block } from 'avail-js-sdk';

export async function fetchTransactionsBySigner() {

    // Initialize SDK with Turing endpoint
    const sdk = await SDK.New('wss://turing-rpc.avail.so/ws');

    // Block hash and signer address to look up
    const blockHash = "0x75a6c54bb5ea904e47fa151956992d7cf543bc7c936d78488e311db8e10397c1";
    const signer = "5CqgQkrDcdg5QrtuxT3H7WszrqgrBMhdwRbmMVXQzc4VSiEg";

    console.log(`Looking up transactions by signer: ${signer}`);
    console.log(`In block: ${blockHash}`);

    // Create a Block object for the specified block hash
    const block = await Block.New(sdk.client, blockHash);

    // Get transactions for the specified signer
    const blockTxs = block.transactions({ txSigner: signer });

    console.log(`Found ${blockTxs.length} transaction(s)`);

    // Display information for each transaction
    if (blockTxs.length === 0) {
        console.log("No transactions found for this signer");
    } else {
        console.log("\nTransaction Details:");
        for (const tx of blockTxs) {
            console.log(`Pallet Name: ${tx.palletName()}`);
            console.log(`Pallet Index: ${tx.palletIndex()}`);
            console.log(`Call Name: ${tx.callName()}`);
            console.log(`Call Index: ${tx.callIndex()}`);
            console.log(`Tx Hash: ${tx.txHash()}`);
            console.log(`Tx Index: ${tx.txIndex()}`);
            console.log(`Signer: ${tx.ss58Address()}`);
            console.log("---");
        }

    }

    console.log("Transaction retrieval completed successfully");
    process.exit(0);
}

// Execute the function
fetchTransactionsBySigner();- Run the script using the following command:
ts-node your-file-name.tsFetch all transactions from a particular block
Here is a complete example of how to fetch all the transactions from a particular block:
avail-js
-
Create a file named
your-file-name.ts -
Paste the following code into your file:
import { SDK, Block } from 'avail-js-sdk';

export async function fetchAllTransactions() {

    // Initialize SDK with Turing endpoint
    const sdk = await SDK.New('wss://turing-rpc.avail.so/ws');

    // Block hash to look up
    const blockHash = "0x9016d7953c88115534a602f2d2548c70c4f5b378d86f4bedda82be2655467c5d";

    console.log(`Looking up all transactions in block: ${blockHash}`);

    // Create a Block object for the specified block hash
    const block = await Block.New(sdk.client, blockHash);

    // Get all transactions in the block
    const blockTxs = block.transactions();

    console.log(`Found ${blockTxs.length} transaction(s)`);

    // Display information for each transaction
    if (blockTxs.length === 0) {
        console.log("No transactions found in this block");
    } else {
        console.log("\nTransaction Details:");
        for (const tx of blockTxs) {
            console.log(`Pallet Name: ${tx.palletName()}`);
            console.log(`Pallet Index: ${tx.palletIndex()}`);
            console.log(`Call Name: ${tx.callName()}`);
            console.log(`Call Index: ${tx.callIndex()}`);
            console.log(`Tx Hash: ${tx.txHash()}`);
            console.log(`Tx Index: ${tx.txIndex()}`);
            console.log(`Signer: ${tx.ss58Address()}`);
            console.log("---");
        }
    }

    console.log("Transaction retrieval completed successfully");
    process.exit(0);
}

// Execute the function
fetchAllTransactions();- Run the script using the following command:
ts-node your-file-name.tsEstimate fees for your data submission
The avail-js SDK provides a method to estimate the cost of submitting a particular piece of data to Avail DA.
Here is how you can use it:
avail-js
Pass data directly
import { initialize, disconnect } from "avail-js-sdk";

const calculateCost = async () => {
  // Initialize the avail sdk providerEndpoint
  const providerEndpoint = await initialize("wss://turing-rpc.avail.so/ws");

  // Dummy sender - insert any address
  const sender = "5CDGXH8Q9DzD3TnATTG6qm6f4yR1kbECBGUmh2XbEBQ8Jfa5";

  //10^18 decimals to denominate to AVAIL
  const DECIMAL = 1000000000000000000;

  // Input the data
  let data = "This is a random piece of string data!!!";

  //Get the estimated cost in AVAIL
  const cost = await providerEndpoint.tx.dataAvailability.submitData(data).paymentInfo(sender);
  const costInAvail = (parseInt(cost.partialFee.toString()) / DECIMAL).toFixed(6);

  console.log(`Estimated Fees: ${costInAvail} AVAIL`);

  await disconnect();
};

calculateCost();- Run the script using the following command:
ts-node your-file-name.ts